


Библиотека сайта rus-linux.net
| [ < ] | [ > ] | [ << ] | [ Up ] | [ >> ] | [Top] | [Contents] | [Index] | [ ? ] |
24. Editing Sound Files
All kinds of tools and applications exist to edit sound files. This chapter shows some of those tools, giving methods for for cutting and pasting sound files, applying effects and filters, and converting sound files between formats.
24.1 Working with Selections from Sound Files Working with selections from sound files. 24.2 Sound Effects Applying some command-line sound effects. 24.3 Converting Sound Files Converting sound files. 24.4 Other Tools for Sound Editing Different audio editing environments and tools.
| [ < ] | [ > ] | [ << ] | [ Up ] | [ >> ] | [Top] | [Contents] | [Index] | [ ? ] |
24.1 Working with Selections from Sound Files
@sf{Debian}: `snd'
@sf{WWW}: http://ccrma-www.stanford.edu/CCRMA/Software/snd/
Snd is a sound-file editing environment for X, and aims to be for sound what Emacs is to text. (And it uses Emacs-style key bindings.)
You'll find a complete manual for it in the `/usr/doc/snd'
directory; this section explains how to use Snd to work with selections
from sound files.
To open a sound file in Snd, give the name of the file to be opened as
an argument to snd.
-
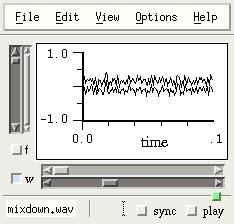
To open the sound file
`mixdown.wav'in Snd, type:$ snd mixdown.wav RET
This command starts Snd with a WAV file called `mixdown.wav':
Making a selection of a sound file in snd is similar to selecting
text in Emacs; you can mark a section of a sound file or recording
you've made in Snd by left-clicking and dragging across the area with
the mouse. The area you drag across becomes shaded and is called the
selection. Once you select a portion of the sound, any effect you
choose works on that selection. You can also cut and paste selections of
the sound you are editing into other sound buffers.
The xwave tool (and many others, no doubt) have similar
capabilities and functions (see section Other Tools for Sound Editing).
24.1.1 Cutting Out Part of a Sound File Cutting out a selection of sound. 24.1.2 Pasting a Selection of Sound Pasting in a selection of sound. 24.1.3 Mixing Sound Files Together Mixing two sound files together.
| [ < ] | [ > ] | [ << ] | [ Up ] | [ >> ] | [Top] | [Contents] | [Index] | [ ? ] |
24.1.1 Cutting Out Part of a Sound File
To cut out a portion of a sound file you are editing in Snd, first make
it the selection by left-clicking and dragging, and then choose
Cut from the Edit menu, somewhat like cropping an image
file.
| [ < ] | [ > ] | [ << ] | [ Up ] | [ >> ] | [Top] | [Contents] | [Index] | [ ? ] |
24.1.2 Pasting a Selection of Sound
Paste a cut sound selection into a different sound buffer in Snd by
opening the new buffer, left-clicking in the target buffer, and then
choosing Paste from the Edit menu. Your most recent
selection will be pasted at the point where you clicked in the sound
buffer.
| [ < ] | [ > ] | [ << ] | [ Up ] | [ >> ] | [Top] | [Contents] | [Index] | [ ? ] |
24.1.3 Mixing Sound Files Together
To mix different audio files together as multiple tracks in Snd, choose
Mix from the File menu and specify the files to use as the
individual tracks.
| [ < ] | [ > ] | [ << ] | [ Up ] | [ >> ] | [Top] | [Contents] | [Index] | [ ? ] |
24.2 Sound Effects
@sf{Debian}: `sox'
@sf{WWW}: http://home.sprynet.com/~cbagwell/sox.html
The "Sound eXchange" tool,
sox, is a sound sample
translator. It reads sound as files or standard input and outputs the
sound either to a file or standard output, while translating in
between. You can use sox to convert sound files between formats
or process sounds with special effects. This section describes some of
the special effects you can apply to sound files with sox.
When applying an effect, the original file is never altered. You must
specify an output file, or use `-' to indicate the standard
output, specifying the output format with `-t'. You can only apply
one effect with each sox command; thus, to add both echo and
reverb to a sound file, you would need to issue two sox commands.
The amount and levels applied for each effect will vary with every situation. As such, consider the following recipes guidelines only for using the options; you will probably end up experimenting a bit to get your intended effect for any particular sound file.
Almost all of the sound effects are applied by specifying the input and output file arguments, followed by the name of the effect to use and any options the effect takes (with notable exceptions, like the `-v' option for changing the amplitude of a file).
NOTE: For more information on the effects Sox can do, see the
various files in `/usr/doc/sox/', and read the sox
man page (see section Reading a Page from the System Manual).
24.2.1 Changing the Amplitude of a Sound File Changing the amplitude of a sound file. 24.2.2 Changing the Sampling Rate of a Sound File Changing a sound file's sampling rate. 24.2.3 Adding Reverb to a Sound File Adding reverb to a sound file. 24.2.4 Adding Echo to a Sound File Adding echo to a sound file. 24.2.5 Adding Flange to a Sound File Adding flange to a sound file. 24.2.6 Adding Phase to a Sound File Adding phase to a sound file. 24.2.7 Adding Chorus to a Sound File Adding chorus to a sound file. 24.2.8 Adding Vibro-Champ Effects to a Sound File Adding Vibro-Champ effects to a sound file. 24.2.9 Reversing a Sound File Reversing a sound file.
| [ < ] | [ > ] | [ << ] | [ Up ] | [ >> ] | [Top] | [Contents] | [Index] | [ ? ] |
24.2.1 Changing the Amplitude of a Sound File
To change the volume or amplitude of a sound file, use sox with
the `-v' option, giving the volume level as an argument. Levels
below 1.0 lower the amplitude, and higher numbers raise it.
-
To raise the volume of file
`old.wav'twofold and write the output to`new.wav', type:$ sox -v3 old.wav new.wav RET
-
To lower the volume of file
`old.wav'by half and write the output to`new.wav', type:$ sox -v.5 old.wav new.wav RET
Use sox with the `stat' option and `-v' to determine
the largest possible value that can be used before distortion or
clipping occurs (it performs a statistical analysis on the file and
outputs a numeric value). This value comes in handy when you want to
raise a file's volume as high as possible without ruining its fidelity.
-
To raise the volume of the file
`quit.cdr'as high as possible without distortion, type:$ sox quiet.cdr loud.cdr stat -v RET 3.125 $ sox -v 3.125 quiet.cdr loud.cdr RET $
The preceding example writes a new file, `loud.cdr'.
| [ < ] | [ > ] | [ << ] | [ Up ] | [ >> ] | [Top] | [Contents] | [Index] | [ ? ] |
24.2.2 Changing the Sampling Rate of a Sound File
To change the sampling rate of a sound file, use the `-r' option followed by the sample rate to use, in Hertz. Like the `-v' option, specify this option before giving the name of the output file.
-
To change the sampling rate of file
`old.wav'to 7,000 Hz, and write the output to`new.wav', type:$ sox old.wav -r 7000 new.wav RET
| [ < ] | [ > ] | [ << ] | [ Up ] | [ >> ] | [Top] | [Contents] | [Index] | [ ? ] |
24.2.3 Adding Reverb to a Sound File
To add reverb to a sound file, use the `reverb' effect. `reverb' takes three arguments: the volume of the output (its "gain-out"), the time (in milliseconds) of reverb, and the length (in milliseconds) of delay. You can specify more than one delay; the more you specify, the more of an overlapping echo the reverb will have.
-
To add a basic reverb to file
`old.wav'and write the output to file`new.wav', type:$ sox old.wav new.wav .5 1000 100 RET
-
To add a spacey, echoing reverb to file
`old.wav'and write the output to`new.wav', type:$ sox old.wav new.wav reverb 1 1000 333 333 333 333 RET
NOTE: This last example makes a sound similar to some of the recordings of the band Flying Saucer Attack. You know who they are, don't you?)
| [ < ] | [ > ] | [ << ] | [ Up ] | [ >> ] | [Top] | [Contents] | [Index] | [ ? ] |
24.2.4 Adding Echo to a Sound File
To add echo to a sound file, use the `echo' effect. It takes as arguments the "gain-in" and "gain-out" volume levels, as well as the delay and decay, both in milliseconds.
-
To add a 100 millisecond echo to the sound file
`old.wav'and write output to`new.wav', type:$ sox old.wav new.wav echo .5 .5 100 .5 RET
-
To add a one-second echo to the sound file
`old.wav'and write output to`new.wav', type:$ sox old.wav new.wav echo .5 .5 1000 .5 RET
-
To add a "tin-can" echo effect to
`old.wav'and write the output to`new.wav', type:$ sox old.wav new.wav echo 1 .5 5 .5 RET
NOTE: The `echos' effect works like `echo', but adds a sequence of echos to the sound file.
| [ < ] | [ > ] | [ << ] | [ Up ] | [ >> ] | [Top] | [Contents] | [Index] | [ ? ] |
24.2.5 Adding Flange to a Sound File
The `flanger' effect adds flange to a sound file. It takes as arguments the "gain-in" and "gain-out" volume levels, as well as the delay and decay in milliseconds, and the speed of the flange, in Hertz. Specify the type of modulation with either `-s' (for sinodial) or `-t' (for triangular).
-
To add an "underwater" flange to the file
`old.wav'and write the output to`new.wav', type:$ sox old.wav new.wav flanger .5 .5 4 .5 1 -t RET
-
To add flange that sounds somewhat like a "wah-wah" effects pedal to
the file
`old.wav'and write the output to`new.wav', type:$ sox old.wav new.wav flanger .5 .5 .5 1 2 -t RET
| [ < ] | [ > ] | [ << ] | [ Up ] | [ >> ] | [Top] | [Contents] | [Index] | [ ? ] |
24.2.6 Adding Phase to a Sound File
The `phaser' effect adds phase to a sound file. It takes the same arguments as the `flanger' effect.
-
To add a heavy phase to the file
`old.wav'and write the output to`new.wav', type:$ sox old.wav new.wav phaser 1 .5 4 .5 1 -s RET
-
To add a phased "breathing" effect to the file
`old.wav'and write the output to`new.wav', type:$ sox old.wav new.wav phaser .5 .5 .5 .9 .5 -t RET
NOTE: Using a decay greater than .5 may result in feedback.
| [ < ] | [ > ] | [ << ] | [ Up ] | [ >> ] | [Top] | [Contents] | [Index] | [ ? ] |
24.2.7 Adding Chorus to a Sound File
To add a chorus effect to a sound file, use `chorus'. Its options are the "gain-in" and "gain-out" of the volume, the delay and decay in milliseconds, the speed in Hertz, and the depth of the chorus in milliseconds. Specify either `-s' or `-t' for sinodial or triangular modulation.
-
To add a 100 millisecond chorus to the file
`old.wav'and write the output to`new.wav', type:$ sox old.wav new.wav chorus 1 .5 100 1 1 1 -t RET
-
To add a deep, "alien-sounding" chorus to the file
`old.wav'and write the output to`new.wav', type:$ sox old.wav new.wav chorus 1 .5 100 1 5 9 -t RET
| [ < ] | [ > ] | [ << ] | [ Up ] | [ >> ] | [Top] | [Contents] | [Index] | [ ? ] |
24.2.8 Adding Vibro-Champ Effects to a Sound File
The `vibro' effect imitates the effect of the Fender Vibro-Champ amplifier. Give the speed in Hertz (30 maximum) as an option, and specify an optional depth value between 0 and 1 (the default is .5).
-
To add a subtle Vibro-Champ effect to the file
`old.wav'and write the output to`new.wav', type:$ sox old.wav new.wav vibro 1 RET
-
To add an effect of a maxed-out Vibro-Champ to the file
`old.wav'and write the output to`new.wav', type:$ sox old.wav new.wav vibro 30 1 RET
| [ < ] | [ > ] | [ << ] | [ Up ] | [ >> ] | [Top] | [Contents] | [Index] | [ ? ] |
24.2.9 Reversing a Sound File
Use the `reverse' effect to reverse the sound in a sound file.
-
To reverse the sound in the file
`old.wav'and write the output to`new.wav', type:$ sox old.wav new.wav reverse RET
| [ < ] | [ > ] | [ << ] | [ Up ] | [ >> ] | [Top] | [Contents] | [Index] | [ ? ] |
24.3 Converting Sound Files
@sf{Debian}: `sox'
@sf{WWW}: http://home.sprynet.com/~cbagwell/sox.html
Use
sox for most sound-file conversions. Give as arguments the
name of the input file and the name of the output file to write to; use
a file name extension specifying the sound format for the output file
(see section Sound File Formats).
-
To convert the file
`new.wav'to an audio CD format file, type:$ sox new.wav new.cdr RET
This command writes a new file, `new.cdr', in the audio CD format;
the original file, `new.wav', is not altered.
You may sometimes need to specify additional options, such as with raw audio files where the sampling rate and other properties must be specified.
-
To convert all of the raw audio files in the current directory to audio
CD format files, type:
$ for i in *.raw RET
{ RET
sox -s -w -c2 -r 44100 $i -x $i.cdr RET
} RET
This command writes all of the `.raw' files to new files of the
same name but with a `.cdr' extension. You could then use
cdrecord to burn an audio CD with the `.cdr' files
(see section Writing an Audio CD-R).
To convert a file to a particular format without using the standard extension, specify the format to write to with the `-t' option.
-
To convert the file
`new.wav'to the audio CD format and write output to a file named`cd-single', type:$ sox new.wav -t cdr cd-single RET
24.3.1 Making an MP3 File Encoding an MP3 file. 24.3.2 Converting MP3 to Another Format Converting an MP3 file to something else.
| [ < ] | [ > ] | [ << ] | [ Up ] | [ >> ] | [Top] | [Contents] | [Index] | [ ? ] |
24.3.1 Making an MP3 File
@sf{WWW}: http://www.sulaco.org/mp3/
The process of making an MP3 file from a raw audio or WAV format audio file is called "encoding" an MP3 file; programs that do this are MP3 encoders. This is not so much a recording process as it is a conversion process: existing audio is converted to an MP3 file. (To make MP3 files from your own recordings, make the recording as a CD-quality WAV file, and then convert that.)
Unfortunately, the algorithm for encoding MP3 is patented, and all software which uses it must pay a license fee--including free software. This restriction makes it difficult for people to create a free software MP3 encoder, and it is the reason why some free software and open source groups advocate the development of a high-quality compressed audio format to replace MP3.(32) A workaround is presented in the form of LAME ("LAME Ain't an MP3 Encoder"). LAME isn't an MP3 encoder, but it is a free software patch file (see section Patching a File with a Difference Report) designed to work with the sample source code distributed by the patent holders of the MP3 encoding process.
This means that you can download both separately and combine them to get
a working MP3 encoder called notlame, perhaps the fastest (yes,
encoding MP3s is a slow process) encoder currently available for
Linux. When you visit the LAME Project at
http://www.sulaco.org/mp3/, you'll find a link to download a
pre-assembled notlame binary from a site in Australia, where the
patent laws do not apply.
The notlame encoder takes two arguments: the name of the input
file and the name of the output file.
-
To encode an MP3 file from a WAV file called
`september-wind.wav', type:$ notlame september-wind.wav september-wind.mp3 RET
It usually takes some time to encode an MP3 file; when notlame
is encoding a file, it continually outputs the current percentage of
completion.
NOTE: Scripts on the download site show how to encode multiple WAV files and how to decode all of the tracks on an audio CD.
| [ < ] | [ > ] | [ << ] | [ Up ] | [ >> ] | [Top] | [Contents] | [Index] | [ ? ] |
24.3.2 Converting MP3 to Another Format
@sf{Debian}: `sox'
@sf{Debian}: `mpg321'
@sf{WWW}: http://home.sprynet.com/~cbagwell/sox.html
@sf{WWW}: http://freshmeat.net/projects/mpg321/
To convert an MP3 file to another format, use
mpg321 (or another
command-line MP3 player) to play the file to the standard output, and
then use sox to read the resultant raw audio and write it to
another file with a specified input format.
-
To convert the MP3 file
`remix.mp3'to a WAV file`remix.wav', type:$ mpg321 -b 10000 -s remix.mp3 | sox -t raw -r 44100 -s -w -c 2 - remix.wav RET
| [ < ] | [ > ] | [ << ] | [ Up ] | [ >> ] | [Top] | [Contents] | [Index] | [ ? ] |
24.4 Other Tools for Sound Editing
Sound software in Linux is a fast-moving target, and it is impossible for a printed volume to keep up with it; you can stay abreast of the latest developments by checking out Dave Phillips's "Sound & MIDI Software for Linux" page at http://www.bright.net/~dlphilp/linuxsound/. This page is the most comprehensive and up-to-date list of Linux-related sound software available.
As with text editors, there are all manner of sound editors, ranging from simple editors to advanced environments. The following table lists a few of the most popular ones.
| SOUND EDITOR | DESCRIPTION |
dap |
Richard Kent's Digital Audio Processor, DAP, is a graphical tool for editing sound files. {@sf{WWW}}: http://www.cee.hw.ac.uk/~richardk/ |
festival |
Festival is a speech-synthesis system. It reads English (British
and American), Spanish, and Welsh plain text input and outputs speech as
sound.
{@sf{Debian}}: `festival'
{@sf{WWW}}: http://www.cstr.ed.ac.uk/projects/festival/
|
gramofile |
Use GramoFile for sampling sound from vinyl records. It can remove
ticks and pops from the sound using filters and signal processing, and
is frequently used to copy records onto CD-Rs.
{@sf{Debian}}: `gramofile'
{@sf{WWW}}: http://panic.et.tudelft.nl/~costar/gramofile/
|
mxv |
MiXViews is an advanced sound editor. Its features include
cross-fades, filters, and various powerful data analysis tools.
{@sf{Debian}}: `mixviews'
{@sf{WWW}}: http://www.create.ucsb.edu/~doug/htmls/MiXViews.html
|
xwave |
XWave is a simple sound editor that contains the basic functions you would expect in a WAV file editor. {@sf{WWW}}: http://www.ibiblio.org/pub/Linux/apps/sound/editors/ |
| [ << ] | [ >> ] | [Top] | [Contents] | [Index] | [ ? ] |