


Библиотека сайта rus-linux.net
| [ < ] | [ > ] | [ << ] | [ Up ] | [ >> ] | [Top] | [Contents] | [Index] | [ ? ] |
10. Viewing Text
Dealing with textual matter is the meat of Linux (and of most computing), so there are going to be many chapters about the various aspects of text. This first chapter in this part of the book shows how to view text on your display screen.
There are many ways to view or otherwise output text. When your intention is to edit the text of a file, open it in a text editor, as described in Text Editing.
Some kinds of files--such as PostScript, DVI, and PDF files--often contain text in them, but they are technically not text files. These are image format files, and I describe methods for viewing them in Previewing Print Files.
NOTE: To learn how to browse files and their contents in a Web browser, see Browsing Files.
10.1 Perusing Text Perusing text on the display. 10.2 Outputting Text Outputting part of a text file. 10.3 Streaming Text Reading a stream of text. 10.4 Viewing a Character Chart Viewing a character chart.
| [ < ] | [ > ] | [ << ] | [ Up ] | [ >> ] | [Top] | [Contents] | [Index] | [ ? ] |
10.1 Perusing Text
Use less to peruse text, viewing it one screen (or "page") at
a time. The less tool works on either files or standard
output--it is popularly used as the last command on a pipeline so that
you can page through the text output of some commands. For an example, see
Redirecting Output to Another Command's Input.
zless is identical to less, but you use it to view
compressed text files; it allows you to read a compressed text file's
contents without having to uncompress it first (see section Compressed Files). Most of the system documentation in the
`/usr/doc' and `/usr/share/doc' directories, for example,
consists of compressed text files.
You may, on occasion, be confronted with a reference to a command for
paging text called more. It was the standard tool for paging text
until it gave way to less in the early to mid-1990s; less
comes with many more options--its most notable advantage being the
ability to scroll backward through a file--but at the expense of
being almost exactly three times the size of more. Hence there
are two meanings to the saying, "less is more."
10.1.1 Perusing a Text File Perusing a file. 10.1.2 Perusing Multiple Text Files Perusing many files at once. 10.1.3 Commands Available While Perusing Text Keystroke commands while you peruse.
| [ < ] | [ > ] | [ << ] | [ Up ] | [ >> ] | [Top] | [Contents] | [Index] | [ ? ] |
10.1.1 Perusing a Text File
To peruse or page through a text file, give the name of the file as an
argument to less.
-
To page through the text file
`README', type:$ less README RET
This command starts less and displays the file `README' on
the screen.
You can more forward through the document a line at a time by typing @downarrow, and you can move forward through the document a screenful at a time by typing PgDn. To move backward by a line, type @uparrow, and type PgUp to move backward by a screenful. [GNU INFO BUG: any <> in the preceding line should be the <- and/or -> arrow keys.]
You can also search through the text you are currently perusing--this is described in Searching Text in Less.
To stop viewing and exit less, press Q.
| [ < ] | [ > ] | [ << ] | [ Up ] | [ >> ] | [Top] | [Contents] | [Index] | [ ? ] |
10.1.2 Perusing Multiple Text Files
You can specify more than one file to page through with less, and
you can specify file patterns in order to open all of the files that
match that pattern.
-
To page through all of the Unix FAQ files in
`/usr/doc/FAQ', type:$ less /usr/doc/FAQ/unix-faq-part* RET
This command starts less, opens in it all of the files that
match the given pattern `/usr/doc/FAQ/unix-faq-part*', and begins
displaying the first one:
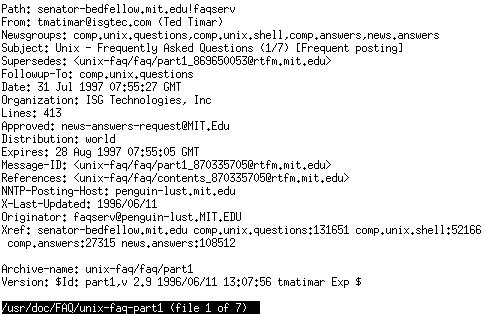
NOTE: When you specify more than one file to page, less
displays each file in turn, beginning with the first file you specify or
the first file that matches the given pattern. To move to the next file,
press N; to move to the previous file, press P.
| [ < ] | [ > ] | [ << ] | [ Up ] | [ >> ] | [Top] | [Contents] | [Index] | [ ? ] |
10.1.3 Commands Available While Perusing Text
The following table gives a summary of the keyboard commands that you
can use while paging through text in less. It lists the
keystrokes and describes the commands.
| KEYSTROKE | COMMAND |
| @uparrow | Scroll back through the text ("up") one line. [GNU INFO BUG: any <> in the preceding line should be the <- and/or -> arrow keys.] |
| @downarrow | Scroll forward through the text ("down") one line. [GNU INFO BUG: any <> in the preceding line should be the <- and/or -> arrow keys.] |
| @leftarrow or @rightarrow | Scroll horizontally (left or right) one tab stop; useful for perusing files that contain long lines. [GNU INFO BUG: any <> in the preceding line should be the <- and/or -> arrow keys.] |
| PgUp or SPC | Scroll forward through the text by one screenful. |
| PgDn | Scroll backward through the text by one screenful. |
C-l |
Redraw the screen. |
/pattern |
Search forward through the file for lines containing pattern. |
?pattern |
Search backward through the file for lines containing pattern. |
< |
Move to beginning of the file. |
> |
Move to end of the file. |
h |
Display a help screen. |
q |
Quit viewing the file and exit less. |
| [ < ] | [ > ] | [ << ] | [ Up ] | [ >> ] | [Top] | [Contents] | [Index] | [ ? ] |
10.2 Outputting Text
The simplest way to view text is to output it to standard output. This is useful for quickly looking at part of a text, or for passing part of a text to other tools in a command line.
Many people still use cat to view a text file, especially if it
is a very small file. To output all of a file's contents on the screen,
use cat and give the file name as an argument.
This isn't always the best way to peruse or read text--a very large text will scroll off the top of the screen, for example--but sometimes the simple outputting of text is quite appropriate, such as when you just want to output one line of a file, or when you want to output several files into one new file.
This section describes the tools used for such purposes. These tools are best used as filters, often at the end of a pipeline, outputting the standard input from other commands.
NOTE: Tools and methods for outputting text for printing, such as outputting text in a font, are described in Converting Plain Text for Output.
10.2.1 Showing Non-printing Characters Showing non-printing characters. 10.2.2 Outputting a Beginning Part of a Text Output the beginning part of a text. 10.2.3 Outputting an Ending Part of a Text Output the ending part of a text. 10.2.4 Outputting a Middle Part of a Text Output the middle part of a text. 10.2.5 Outputting the Text between Strings Output the text between strings. 10.2.6 Outputting Text in a Dialect Output text in a dialect.
| [ < ] | [ > ] | [ << ] | [ Up ] | [ >> ] | [Top] | [Contents] | [Index] | [ ? ] |
10.2.1 Showing Non-printing Characters
Use cat with the `-v' option to output non-printing
characters, such as control characters, in such a way so that you can
see them. With this option, cat outputs those characters in
hat notation, where they are represented by a `^' and the
character corresponding to the actual control character (for example, a
bell character would be output as `^G').
-
To peruse the file
`translation'with non-printing characters displayed in hat notation, type:$ cat -v translation | less RET
In this example, the output of cat is piped to less for
viewing on the screen; you could have piped it to another command, or
redirected it to a file instead.
To visually display the end of each line, use the `-E' option; it specifies that a `$' should be output after the end of each line. This is useful for determining whether lines contain trailing space characters.
Also useful is the `-T' option, which outputs tab characters as `^I'.
The `-A' option combines all three of these options--it is the same as specifying `-vET'.
| [ < ] | [ > ] | [ << ] | [ Up ] | [ >> ] | [Top] | [Contents] | [Index] | [ ? ] |
10.2.2 Outputting a Beginning Part of a Text
Use head to output the beginning of a text. By default, it
outputs the first ten lines of its input.
-
To output the first ten lines of file
`placement-list', type:$ head placement-list RET
You can specify as a numeric option the number of lines to output. If
you specify more lines than a file contains, head just outputs
the entire text.
-
To output the first line of file
`placement-list', type:$ head -1 placement-list RET
-
To output the first sixty-six lines of file
`placement-list', type:$ head -66 placement-list RET
To output a given number of characters instead of lines, give the number of characters to output as an argument to the `-c' option.
-
To output the first character in the file
`placement-list', type:$ head -c1 placement-list RET
| [ < ] | [ > ] | [ << ] | [ Up ] | [ >> ] | [Top] | [Contents] | [Index] | [ ? ] |
10.2.3 Outputting an Ending Part of a Text
The tail tool works like head, but outputs the last part
of its input. Like head, it outputs ten lines by default.
-
To output the last ten lines of file
`placement-list', type:$ tail placement-list RET
-
To output the last fourteen lines of file
`placement-list', type:$ tail -14 placement-list RET
It is sometimes useful to view the end of a file on a continuing basis;
this can be useful for a "growing" file, a file that is being written
to by another process. To keep viewing the end of such a file, use
tail with the `-f' ("follow") option. Type C-c to
stop viewing the file.
-
To follow the end of the file
`access_log', type:$ tail -f access_log RET
NOTE: You can achieve the same result with less; to do
this, type F while perusing the text (see section Perusing Text).
| [ < ] | [ > ] | [ << ] | [ Up ] | [ >> ] | [Top] | [Contents] | [Index] | [ ? ] |
10.2.4 Outputting a Middle Part of a Text
There are a few ways to output only a middle portion of a text.
To output a particular line of a file, use the sed tool
(see section Editing Streams of Text). Give as a quoted
argument the line number to output followed by `!d'. Give the file
name as the second argument.
-
To output line 47 of file
`placement-list', type:$ sed '47!d' placement-list RET
To output a region of more than one line, give the starting and ending line numbers, separated by a comma.
-
To output lines 47 to 108 of file
`placement-list', type:$ sed '47,108!d' placement-list RET
You can also combine multiple head or tail commands on a
pipeline to get the desired result (see section Redirecting Output to Another Command's Input).
-
To output the tenth line in the file
`placement-list', type:$ head placement-list | tail -1 RET
-
To output the fifth and fourth lines from the bottom of file
`placement-list', type:$ tail -5 placement-list | head -2 RET
-
To output the 500th character in
`placement-list', type:$ head -c500 placement-list | tail -c1 RET
-
To output the first character on the fifth line of the file
`placement-list', type:$ head -5 placement-list | tail -1 | head -c1 RET
In the preceding example, three commands were used: the first five lines
of the file `placement-list' are passed to tail, which
outputs the last line in the output (the fifth line in the file); then,
the last head command outputs the first character in that last
line, which achieves the desired result.
| [ < ] | [ > ] | [ << ] | [ Up ] | [ >> ] | [Top] | [Contents] | [Index] | [ ? ] |
10.2.5 Outputting the Text between Strings
Use sed to select lines of text between strings and output either
just that section of text, or all of the lines of text except
that section. The strings can be words or even regular expressions
(see section Regular Expressions--Matching Text Patterns).
Use the `-n' option followed by `'/first/,/last/p'' to output just the text between the strings first and last, inclusive. This is useful for outputting, say, just one chapter or section of a text file when you know the text used to begin the sections with.
-
To output all the text from file
`book-draft'between `Chapter 3' and `Chapter 4', type:$ sed -n '/Chapter 3/,/Chapter 4/p' book-draft RET
To output all of the lines of text except those between two patterns, omit the `-n' option.
-
To output all the text from file
`book-draft', except that which lies between the text `Chapter 3' and `Chapter 4', type:$ sed '/Chapter 3/,/Chapter 4/p' book-draft RET
NOTE: For a more thorough introduction to sed, see
Editing Streams of Text.
| [ < ] | [ > ] | [ << ] | [ Up ] | [ >> ] | [Top] | [Contents] | [Index] | [ ? ] |
10.2.6 Outputting Text in a Dialect
@sf{Debian}: `filters'
@sf{WWW}: http://www.princeton.edu/~mkporwit/pub_links/davido/slang/
@sf{WWW}: http://www.mathlab.sunysb.edu/~elijah/src.html
There are all kinds of tools that work as filters on text; this recipe describes a specific group of filters--those that filter their standard input to give the text an accent or dialect, and are intended to be humorous.
Generally speaking, a filter is a tool that works on standard input, changing it in some way, and then passing it to standard output.
-
To apply the
krautfilter to the text in the file`/etc/motd', type:$ cat /etc/motd | kraut RET
These commands pass the contents of the file `/etc/motd' to the
kraut filter, whose output is then sent to standard output. The
contents of `/etc/motd' are not changed.
Some of the dialect filters available include nyc, which gives a
"New Yawker" dialect to text, and newspeak, which translates
text into the approved language of the thought police, as described in
George Orwell's novel, 1984. Hail Big Brother!
| [ < ] | [ > ] | [ << ] | [ Up ] | [ >> ] | [Top] | [Contents] | [Index] | [ ? ] |
10.3 Streaming Text
@sf{WWW}: http://www.maurer-it.com/open-source/sview/
It's been demonstrated that people read and comprehend printed text faster than they read and comprehend text displayed on a computer display screen. Rapid serial visual presentation, or RSVP, is a technique that aims to increase reading speed and comprehension with the use of computer display screens. With this technique, text is displayed streamed on the screen, one word at a time, with pauses between words and punctuation. The average reading time is lowered and comprehension is increased significantly with this technique.
GNOME sview is a "streaming viewer" for X; it streams text a
word at a time on the screen, at a default rate of 450 words per
minute. Use it to read text files and the X selection, which is text you
have selected with the mouse (see section Selecting Text).
To open a file in sview, either specify it as an argument to the
command, or choose Open from the File menu in
sview, and select the file from there.
-
To view the contents of the text file
`alice-in-wonderland'insview, type:$ sview alice-in-wonderland RET
To start streaming the text, either press S once, or left-click on the button marked RSVP. Both S and the RSVP button toggle the streaming; the left and right arrow keys control the speed.
Text being streamed with sview looks like this:
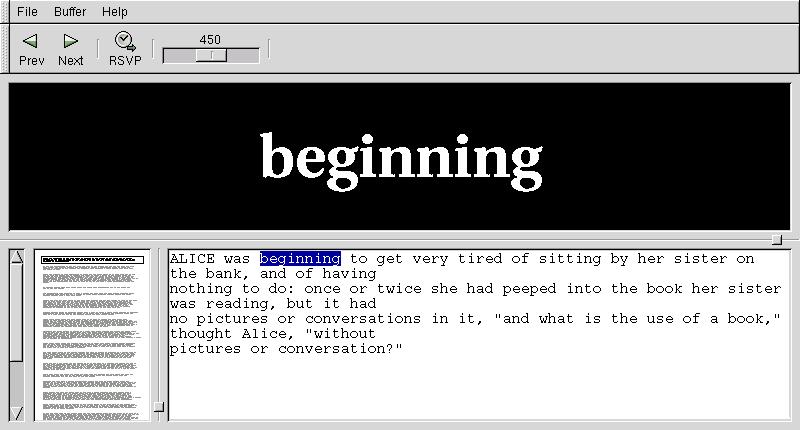
The large area with the word `beginning' in it is where the text is being streamed. The text in the lower-left window is a shrunken view of the entire file, the text in the lower-right window is the paragraph from which the current word comes from.
To open another file, choose it from the menu; you can have many files
open in sview at once. sview places each file in its own
buffer. You can also paste the X selection into a buffer of its own--to
switch to a different buffer, choose its name from the Buffer
menu.
Type Q to quit reading and exit sview.
The following table lists the keyboard commands used in sview and
describes their meaning.
| KEYSTROKE | DESCRIPTION |
@leftarrow |
Decrease the stream speed. [GNU INFO BUG: any <> in the preceding line should be the <- arrow key.] |
@rightarrow |
Increase the stream speed. [GNU INFO BUG: any <> in the preceding line should be the -> arrow key.] |
C-o |
Open a file. |
C-q |
Quit viewing text and exit sview.
|
C-w |
Erase the current text buffer. |
M-n |
Move forward to the next word. |
M-p |
Move backward to the previous word. |
S |
Toggle the streaming of text. |
X |
Display the X selection in its own buffer. |
N |
Move forward to the next paragraph. |
P |
Move backward to the previous paragraph. |
| [ < ] | [ > ] | [ << ] | [ Up ] | [ >> ] | [Top] | [Contents] | [Index] | [ ? ] |
10.4 Viewing a Character Chart
To view a character chart containing a list of all the valid characters
in the ASCII character set and the character codes to use to type them,
view the ascii man page.
-
To view an ASCII character set, type:
$ man ascii RET
You can use the octal codes listed for each character to type them in Emacs--see Inserting Special Characters in Emacs.
The default Linux character set, the ISO 8859-1 ("Latin 1") character set, contains all of the standard ASCII character set plus an additional 128 characters.
To view the ISO 8859-1 character set, which contains an extended set of
characters above the standard 127 ASCII characters, view the
iso_8859_1 man page.
-
To view the ISO 8859-1 character set, type:
$ man iso_8859_1 RET
You can use this page to see all of the characters in this character set and how to input them.
NOTE: There's a special way to "quote" these characters in Emacs; this technique is described in Inserting Special Characters in Emacs.
The `miscfiles' package also contains charts for these character
sets, as explained in Word Lists and Reference Files.
| [ << ] | [ >> ] | [Top] | [Contents] | [Index] | [ ? ] |