Библиотека сайта rus-linux.net

Chapter 10. Printing
Sending Print Jobs to Samba
A printer shared by the Samba server shows up in the list of shares offered in the Network Neighborhood. If the printer is registered on the client machine and the client has the correct printer driver installed, the client can effortlessly send print jobs to a printer attached to a Samba server. Figure 10-1 shows a Samba printer as it appears in the Network Neighborhood of a Windows client.
Figure 10-1. A Samba printer in the Network Neighborhood
To administer printers with Samba, you should understand the basic process by which printing takes place on a network. On the client system, the application software prints by utilizing the system's printer driver for the printer that will be creating the actual output. It is the printer driver software running on the client system that translates the application's high-level calls into a stream of binary data specific to the model of printer in use. In the case of a serial, parallel, or USB printer, the data is stored in a temporary file in the local system's printer queue and then sent through the respective port directly to the printer. For a network printer, the file is sent over the network.
TIP
Sending a print job to a printer on a Samba server involves four steps:
Print Commands
lpr -r -Pprinter file
This command tells lpr to retrieve the name of the printer in the system configuration file (/etc/printcap) and interpret the rules it finds there to decide how to process the data and which physical device to send it to. Note that because the -r option has been specified, the file will be deleted after it has been printed. Of course, the file removed is just a copy stored on the Samba server; the original document on the client is unaffected.
The process is similar on System V Unix. Here, printing and deleting become a compound command:
lp -dprinter -s file; rm file
A Minimal Printing Setup
Let's start with a simple yet illustrative
printing
share. Assuming that you're on a Linux system and
you have a printer called netprinter listed in the
printer capabilities file, the following addition to your
smb.conf file makes the printer accessible
through the network:
[printer1]
    printable = yes
    print command = /usr/bin/lpr -P%p -r %s
    printer = netprinter
    printing = BSD
    path = /var/tmp
The variable %s in the
print command
option is replaced with the name of the file to be printed when Samba
executes the command. There are four Samba configuration-file
variables specifically for use with
printing
options. They are shown in Table 10-1.
Table 10-1. Printing variables
|
Variable |
Definition |
|---|---|
|
|
The full pathname of the file on the Samba server to be printed |
|
|
The name of the file itself (without the preceding path) on the Samba server to be printed |
|
|
The name of the Unix printer to use |
|
|
The number of the print job (for use with |
[printer1]
    printing = SYSV
    print command = lp -d%p -s %s; rm %s
Here are a few important items to remember about printing shares:
-
You must put
printable=yesin all printer shares (even[printers]) so that Samba knows they are printer shares. If you forget, the shares will be unusable for printing and will instead be treated as disk shares.
[deskjet]
    printable = yes
    path = /var/spool/samba/print
    valid users = elizabeth cozy jack heather alexander lina emerald
All the other share accessibility options work for printing shares as well.
The [printers] Share
If a share named
[printers] is in the configuration file,
Samba will automatically read in your printer capabilities file and
create a printing share for each printer that appears in the file.
For example, if the Samba server had lp,
pcl, and ps printers in its
printer capabilities file, Samba would provide three printer shares
with those names, each configured with the options in the
[printers] share.
Here is an example
[printers] share for a Linux system. Some of
these options are already defaults; however, we have listed them
anyway for illustrative purposes:
[printers]
    printable = yes
    printing = BSD
    printcap name = /etc/printcap
    print command = /usr/bin/lpr -P%p -r %s
    path = /var/spool/lpd/tmp
    min print space = 2000
Testing the Configuration
After running testparm and restarting the Samba daemons, you can check to make sure everything is set up correctly by using smbclient to send a file to the printer. Connect to the printer using the command:
#smbclient /server/printshare
and then use the print command to print a file:
smb: />
TIP
When you print something through the Samba server via smbclient, the following actions should occur:
-
The job appears (briefly) in the Samba spool directory specified by the path.
-
The job disappears from the spool directory that Samba used.
If smbclient cannot print, you can reset the
print command option to collect
debugging information:
print command = echo "printed %s on %p" >>/tmp/printlog
A common
problem with Samba printer configuration is forgetting to use the
full pathnames for commands. Another frequent problem is not having
the correct permissions on the spooling directory.[1] As usual,
check your Samba log files and system log files for error messages.
If you use BSD printing, you can change the lp
keyword in the printer's printcap entry to something
other than /dev/null, allowing you to collect
error messages from the printing system.
TIP
More information on debugging printers is in the file docs/textdocs/Printing.txt in the Samba source distribution. The Unix print systems are covered in detail in фleen Frisch's Essential Systems Administration (published by O'Reilly).
Enabling SMB Printer Sharing in Mac OS X
With Samba preinstalled with Mac OS X, sharing access to a printer among Windows clients is easy. First, of course, you should set up local access using the Print Center application (located in /Applications/Utilities). Under the Printers menu, select Add Printer..., and make the appropriate selection from the pop-up menu. For example, if the printer is directly attached, select USB; if the printer is powered on, it should appear in the list. Choose the printer, and press the Add button.
Edit /etc/smb.conf, uncommenting the
[printers] share and making any additional
configuration changes you feel are necessary. Finally, enable the
Samba startup item as described in Chapter 2,
either by checking Windows File Sharing in Sharing Preferences or by
manually editing /etc/hostconfig. Now your
printer can be used by remote Windows clients.
On Mac OS X and some other BSD-based systems, you can test your configuration using smbutil. The following will send the file named print_test_file to the printer named printshare on the server bsdserver :
%smbutil print //bsdserver/printshare print_test_file
Setting Up and Testing a Windows Client
Now that Samba is
offering a workable printer, you can set up your access to it on a
Windows client. Browse through the Samba server in the Network
Neighborhood. It should now show each printer that is available. For
example, in Figure 10-1, we saw a printer called
lp.
Next, you need to have the Windows client recognize the printer. Double-click the printer icon to get started. If you try to select an uninstalled printer (as you just did), Windows will ask you if it should help configure it for the Windows system. Click the Yes or OK button, and the Printer Wizard will open.
If you are installing a printer on Windows 95/98/Me, the first thing the wizard will ask is whether you need to print from DOS. Let's assume you don't, so choose the "No" radio button and press the Next > button to get to the manufacturer/model window, as shown in Figure 10-2.
Figure 10-2. Setting the manufacturer and model of the printer
Click the Next > or OK button. On Windows 95/98/Me, the Printer
Wizard asks you to name the printer. On Windows NT/2000/XP, you need
to right-click the printer's icon and select
Properties to assign the printer a name. Figure 10-3
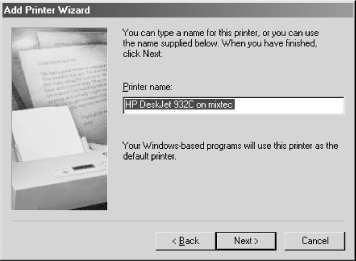
shows how we've named our printer to show that
it's shared by the mixtec Samba
server.
Figure 10-3. Setting the printer name
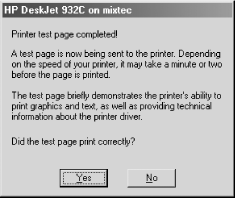
Finally, on Windows 95/98/Me the Printing Wizard asks if it should print a test page. Click the "Yes" radio button, then the Finish button, and you should be presented with the dialog box shown in Figure 10-4. On Windows NT/2000/XP, the printer test function is also accessed through the printer's Properties dialog box.
Figure 10-4. Sending a test page to the printer
Printing to Windows Printers
Sharing Windows Printers
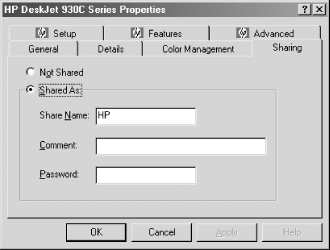
Sharing printers on Windows is not unlike sharing files. In fact, it is a little simpler. Open the Control Panel, then double-click the Printers icon to open the Printers window. Right-click the icon for the printer you want to share, and select Sharing.... This opens the dialog box shown in Figure 10-5 for a Windows 98 system, or Figure 10-6 on a Windows 2000 system. (The dialog box appears slightly different on other Windows versions, but functions almost identically.)
TIP
On Windows 95/98/Me systems, you may need to run file sharing in share-level (rather than user-level) access control mode to access a shared printer from Samba. To check or set this mode, go to Control Panel, then double-click on Network, then click on the Access Control tab. More detailed information on this can be found in Chapter 5.
Figure 10-5. Sharing printers on Windows 98
Figure 10-6. Sharing printers on Windows 2000
Adding a Unix Printer
The Samba distribution comes with three programs that assist with printing on shared printers. The smbprint program works with systems that use the BSD printing system, smbprint.sysv works with systems that use System V printing, and smbspool works with systems that use the Common Unix Printing System (CUPS). In the following sections we show you how to install printers for each system.
BSD printers
The BSD printing system is used by many Unix variants, including Red Hat Linux. With BSD printing, all the printers on the system have an entry in the /etc/printcap file, which is the database of printer capabilities used by the lpd line printer daemon and other programs that assist with printing. The Red Hat Linux implementation is a bit different in that /etc/printcap is a machine-generated file, which is re-created every time the lpd daemon is restarted by the /etc/rc.d/init.d/lpd script. Instead of editing /etc/printcap, we will add an entry for our printer in /etc/printcap.local, which the system automatically includes verbatim when creating /etc/printcap.
TIP
Here is the entry we added to our
/etc/printcap.local file to support our Hewlett-Packard
DeskJet 932C printer, which is shared by maya, a
Windows 98 system:
lp|maya-hp932c:\
    :cm=HP 932C on maya:\
    :sd=/var/spool/lpd/maya:\
    :af=/var/spool/lpd/maya/acct:\
    :if=/usr/local/samba/bin/smbprint:\
    :mx=0:\
    :lp=/dev/null:
Go to your Samba source distribution's root directory, and install the smbprint program like this:
#cp examples/printing/smbprint /usr/local/samba/bin
We next create the printer's spool directory:
#cd /var/spool/lpd#mkdir maya#chown lp:lp maya#chmod 700 maya
#cd maya#>.config#chown lp:lp .config#chmod 600 .config
Use your preferred text editor to edit the .config file, and enter three lines, like this:
server=maya
service=hp
password=""
Finally, restart the printer daemon:
#/etc/rc.d/init.d/lpd restart
You can now try printing something. Run the following command:
$lpr textfile
If you have everything set up correctly, the file prints on the
shared printer. If you get "stair
stepping" of text, caused by the printer not
returning to the left margin at the beginning of every line, modify
the if keyword in your printcap entry to run
smbprint with the -t
option.
System V printers
Sending print jobs from a System V Unix system is a little easier than with the BSD system. Here, you need to edit the smbprint.sysv script in the examples/printing directory of the Samba distribution and do the following:
CUPS printers
CUPS[2] uses a set of modules, called backends, to send print jobs to various destinations, such as local printers attached to parallel, serial, or Universal Serial Bus (USB) ports, or over the network using Unix line printer daemon (LPD) protocol, Internet Printing Protocol (IPP), AppleTalk Printer Access Protocol (PAP), and so on. The software package does not come with a backend for SMB; the Samba suite includes the smbspool utility for this purpose.
#ln -s /usr/local/samba/bin/smbspool /usr/lib/cups/backend/smb
#lpadmin -p hp932c -E -v smb://maya/hp932c -D "HP 932C on maya"
smb://[username[:password]@][workgroup/]server/printshare
The lpadmin command makes changes to /etc/cups/printers.conf and sends a HUP signal to the cupsd daemon, resulting in the creation of a local raw printer spool. In this example, print data is passed in raw format to the Windows system, which has the necessary printer drivers and printer description files to format the data appropriately. The -D option is used to give the printer a comment string.
$lpr -P hp932c textfile
You should now be set up to use the printer from any application on the Unix system.
Samba Printing Options
Table 10-2 summarizes the Samba printing options.
Table 10-2. Printing configuration options
|
Option |
Parameters |
Function |
Default |
Scope |
|---|---|---|---|---|
|
|
|
Printing system type of the Samba host |
System-dependent |
Share |
|
|
boolean |
Marks a share as a printing share |
|
Share |
|
|
string (Unix printer name) |
Name for the printer that is shown to clients |
System-dependent |
Share |
|
|
numeric (time in seconds) |
Amount of time in seconds that Samba will cache the printer queue status |
|
Global |
|
|
boolean |
Treats all print jobs as PostScript by prefixing
|
|
Share |
|
|
boolean |
If |
|
Global |
|
|
string (shell command) |
Unix command to perform printing |
See below |
Share |
|
|
string (shell command) |
Unix command to return the status of the printing queue |
See below |
Share |
|
|
string (shell command) |
Unix command to remove a job from the printing queue |
See below |
Share |
|
|
string (shell command) |
Unix command to pause a job on the printing queue |
See below |
Share |
|
|
string (shell command) |
Unix command to resume a paused job on the printing queue |
See below |
Share |
|
|
string (filename) |
Location of the printer capabilities file |
System-dependent |
Global |
|
|
numeric (size in kilobytes) |
Minimum amount of free disk space that must be present to print |
|
Share |
|
|
string (shell command) |
Unix command to pause a queue |
See below |
Share |
|
|
string (shell command) |
Unix command to resume a queue |
See below |
Share |
printing
The printing configuration option tells
Samba which printing system to use. There are
several different families of commands to control printing and print
statusing. Samba supports seven different types, as shown in Table 10-3.
Table 10-3. Printing system types
|
Variable |
Definition |
|---|---|
|
BSD |
Berkeley Unix system |
|
SYSV |
System V |
|
CUPS |
Common Unix Printing System |
|
AIX |
IBM's AIX operating system |
|
HPUX |
Hewlett-Packard Unix |
|
QNX |
QNX Realtime Operating System |
|
LPRNG |
LPR Next Generation |
|
SOFTQ |
SOFTQ system |
|
PLP |
Portable Line Printer |
The value for this option must be one of these seven selections. For example:
printing = SYSV
Setting the printing configuration option
automatically sets at least three other printing options for the
service in question: print
command, lpq
command, and lprm
command. If you are running Samba on a system that
doesn't support any of the printing styles listed in
Table 10-3, simply set the commands for each of
these manually.
printable
The printable option must be set to
yes to flag a share as a printing service. If this
option is not set, the share will be treated as a disk share instead.
You can set the option as follows:
[printer1]
    printable = yes
printer
The option, also called
printer name,
specifies the name of the printer on the server to which the share
points. This option has no default and should be set explicitly in
the configuration file, even though Unix systems themselves often
recognize a default name such as lp for a printer.
For example:
[deskjet]
    printer = hpdkjet1
lpq cache time
The global lpq cache
time option allows you to set the number of
seconds for which Samba will remember the current printer status.
After this time elapses, Samba will issue an lpq
command (or whatever command you specify with the
lpq command option) to get a
more up-to-date status that it can report to users. This defaults to
10 seconds, but can be increased if your lpq
command takes an unusually long time to run or you
have lots of clients. A time setting of 0 disables caching of queue
status. The following example resets the time to 30 seconds:
[deskjet]
    lpq cache time = 30
postscript
The postscript option forces the
printer to treat all data sent to it as PostScript. It does this by
prefixing the characters %! to the beginning of
the first line of each job. It is normally used with PCs that insert
a ^D (control-D or
"end-of-file" mark) in front of the
first line of a PostScript file. It will not, obviously, turn a
non-PostScript printer into a PostScript one. The default value of
this options is no. You can override it as
follows:
[deskjet]
    postscript = yes
load printers
The load printers
option tells Samba to create shares for all known printer names and
load those shares into the browse list. Samba will create and list a
printer share for each printer name in
/etc/printcap (or the system equivalent). For
example, if your
printcap file looks
like this:[3]
lp:\
  :sd=/var/spool/lpd/lp:\            spool directory
  :mx#0:\                            maximum file size (none)
  :sh:\                              supress burst header (no)
  :lp=/dev/lp1:\                     device name for output
  :if=/var/spool/lpd/lp/filter:      text filter

laser:\
  :sd=/var/spool/lpd/laser:\         spool directory
  :mx#0:\                            maximum file size (none)
  :sh:\                              supress burst header (no)
  :lp=/dev/laser:\                   device name for output
  :if=/var/spool/lpd/lp/filter:      text filter
the shares [lp] and [laser] are
automatically created as valid print shares when Samba is started.
Both shares borrow the configuration options specified in the
[printers] section to configure themselves and are
available in the browse list for the Samba server. The default value
for this option is yes. If you prefer to specify
each printer explicitly in your configuration file, use the
following:
[global]
    load printers = no
print command, lpq command, lprm command,lppause command, lpresume command
lpq command = /usr/ucb/lpq %p
This would set lpq command to
use /usr/ucb/lpq. Similarly:
lprm command = /usr/local/bin/lprm -P%p %j
The default values for each option are dependent on the value of the
printing option. Table 10-4
shows the default commands for each printing option. The most popular
printing system is BSD.
Table 10-4. Default commands for various printing options
|
Option |
BSD, AIX, PLP, LPRNG |
SYSV, HPUX |
QNX |
SOFTQ |
|---|---|---|---|---|
|
|
|
|
|
|
|
|
|
|
|
|
|
|
|
|
|
|
|
|
(SYSV only) |
None |
None |
None |
|
|
(SYSV only) |
None |
None |
|
print command = /usr/local/lpr -P%p %s; /bin/rm %s
With a bit of judicious programming, these smb.conf options can also be used for debugging:
print command = cat %s >>/tmp/printlog; lpr -r -P%p %s
lp|print1|My Printer 1
print2|My Printer 2
print3|My Printer 3
printcap name
If the printcap
name option (also called
printcap) appears in a printing share, Samba uses
the file specified as the system printer capabilities file (normally
/etc/printcap). However, you can reset it to a
file consisting of only the printers you want to share over the
network. The value must be the filename (with its complete path
specified) of a printer capabilities file on the server:
[deskjet]
    printcap name = /usr/local/samba/lib/printcap
[global]
    printing = cups
    printcap name = cups
min print space
The min print
space option sets the amount of space that must be
available on the disk that contains the spool directory if printing
is to be allowed. Setting it to zero (the default) turns the check
off; setting it to any other number sets the amount of free space in
kilobytes required. This option helps to avoid having print jobs fill
up the remaining disk space on the server, which can cause other
processes to fail:
[deskjet]
    min print space = 4000
Footnotes
[1] If you are using Linux, you can use the checkpc command to check for this type of error.
[2] CUPS is open source software (http://www.opensource.org) developed by Easy Software Products. For more information, visit http://www.cups.org.
[3] We have placed annotated comments off to the right in case you've never dealt with this file before.

